Step 4 of 9

Get oriented — your workspace

Let's clean up the platform, configure critical settings, learn what's what, create your Oracle workspace, and set up your first charts. This is where it starts to feel real.

1

Meet the Control Center

The Control Center is NinjaTrader's home base. Everything flows from here — connections, charts, orders, logs, strategy management. It's always running while NT is open.

NinjaTrader Control Center with Strategies tab selected
The Control Center — your home base. Notice the green connection dot, the Strategies tab, and the menu bar across the top.

Key areas of the Control Center:

  • Menu bar — New, Tools, Workspaces, Connections, Help, Chat
  • Connection status — Green dot = connected to your data feed
  • Tabs — Orders, Executions, Strategies, Positions, Accounts, Log
  • Messages — Shows system messages and alerts
Control Center menu bar close-up
Menu bar close-up — NinjaTrader, New, Tools, Workspaces, Connections, Help, Chat
2

Close everything except Control Center

NinjaTrader may have opened some default windows — charts, the news feed, or other panels. Close all of them. We want a clean slate.

The only window that should remain open is the Control Center. If you close it, NinjaTrader closes entirely — so leave it open.

Desktop showing charts and windows to close, leaving only Control Center
Close all extra windows — charts, SuperDOM, everything. Only the Control Center stays open.
Why start clean?

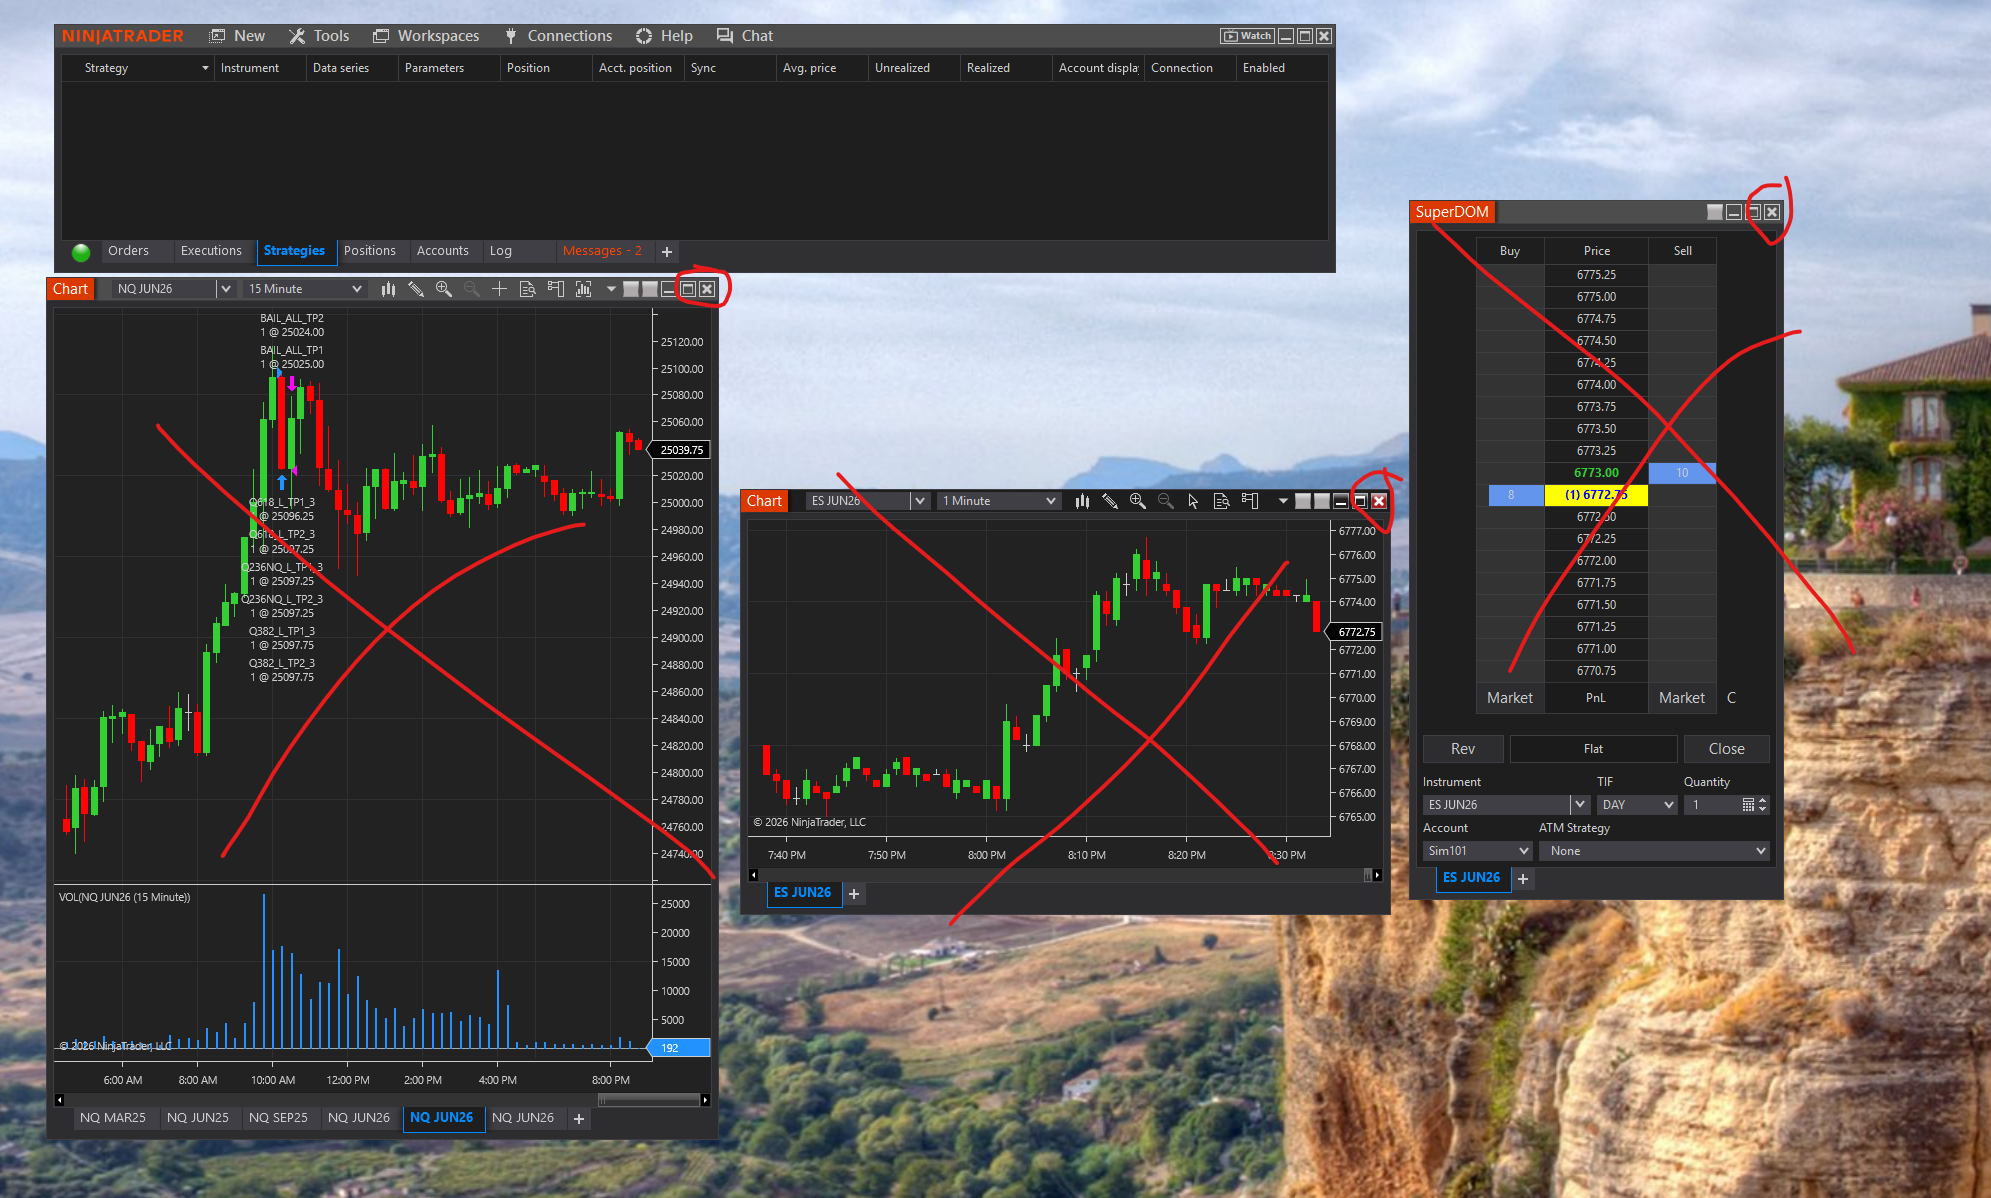
Default workspaces can have settings that interfere with your algo setup. Starting fresh ensures everything is configured exactly right.

3

Configure critical platform settings

Before we build anything, two settings must be configured. These affect how your algorithms connect and how trade times are calculated.

In the Control Center menu bar:

  • Click Tools in the menu bar
  • Click Settings (at the bottom of the menu)
NinjaTrader Tools menu with Settings highlighted at the bottom
Tools → Settings — opens the platform Settings window.

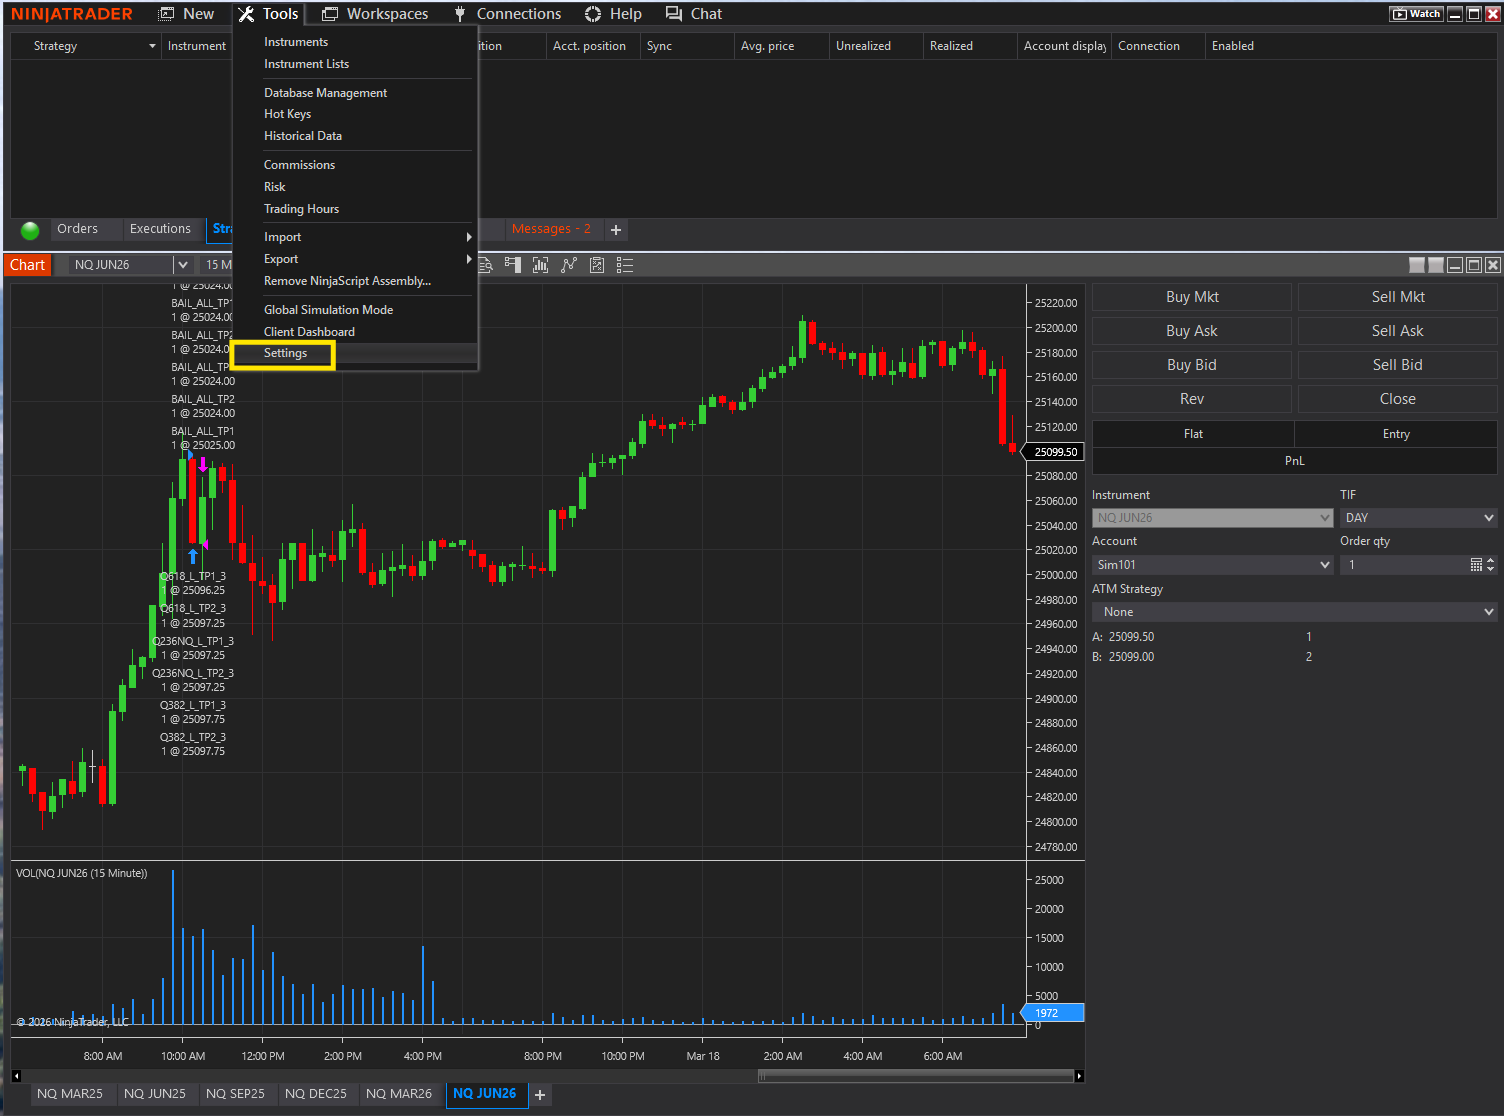
In the Settings window, make sure General is selected in the left panel. Then change these two settings:

⚙ Two Required Settings

  • Multi-provider — Check this box to enable it. This allows NinjaTrader to connect to multiple data providers simultaneously (e.g., Rithmic + NinjaTrader sim). Required if you run prop firm accounts alongside any other connection.
  • Time zone — Set to (UTC-05:00) Eastern Time (US & Canada). All of our algorithms use Eastern Time for trade session logic. If this is set wrong, your algos will enter and exit at the wrong times.
NinjaTrader Settings General tab showing Multi-provider checkbox enabled and Time zone set to Eastern Time
Settings → General — Enable Multi-provider (checked) and set Time zone to (UTC-05:00) Eastern Time.

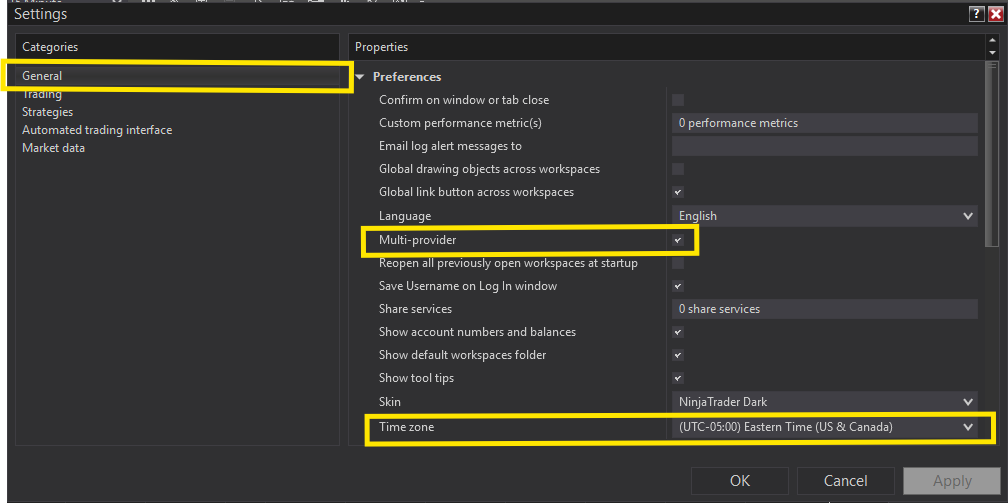
Click OK to save your settings.

Do not skip this step

If Multi-provider is not enabled, you won't be able to connect multiple accounts. If the time zone is wrong, your algorithms will trade outside their intended sessions. Both settings are critical.

4

Create a new workspace

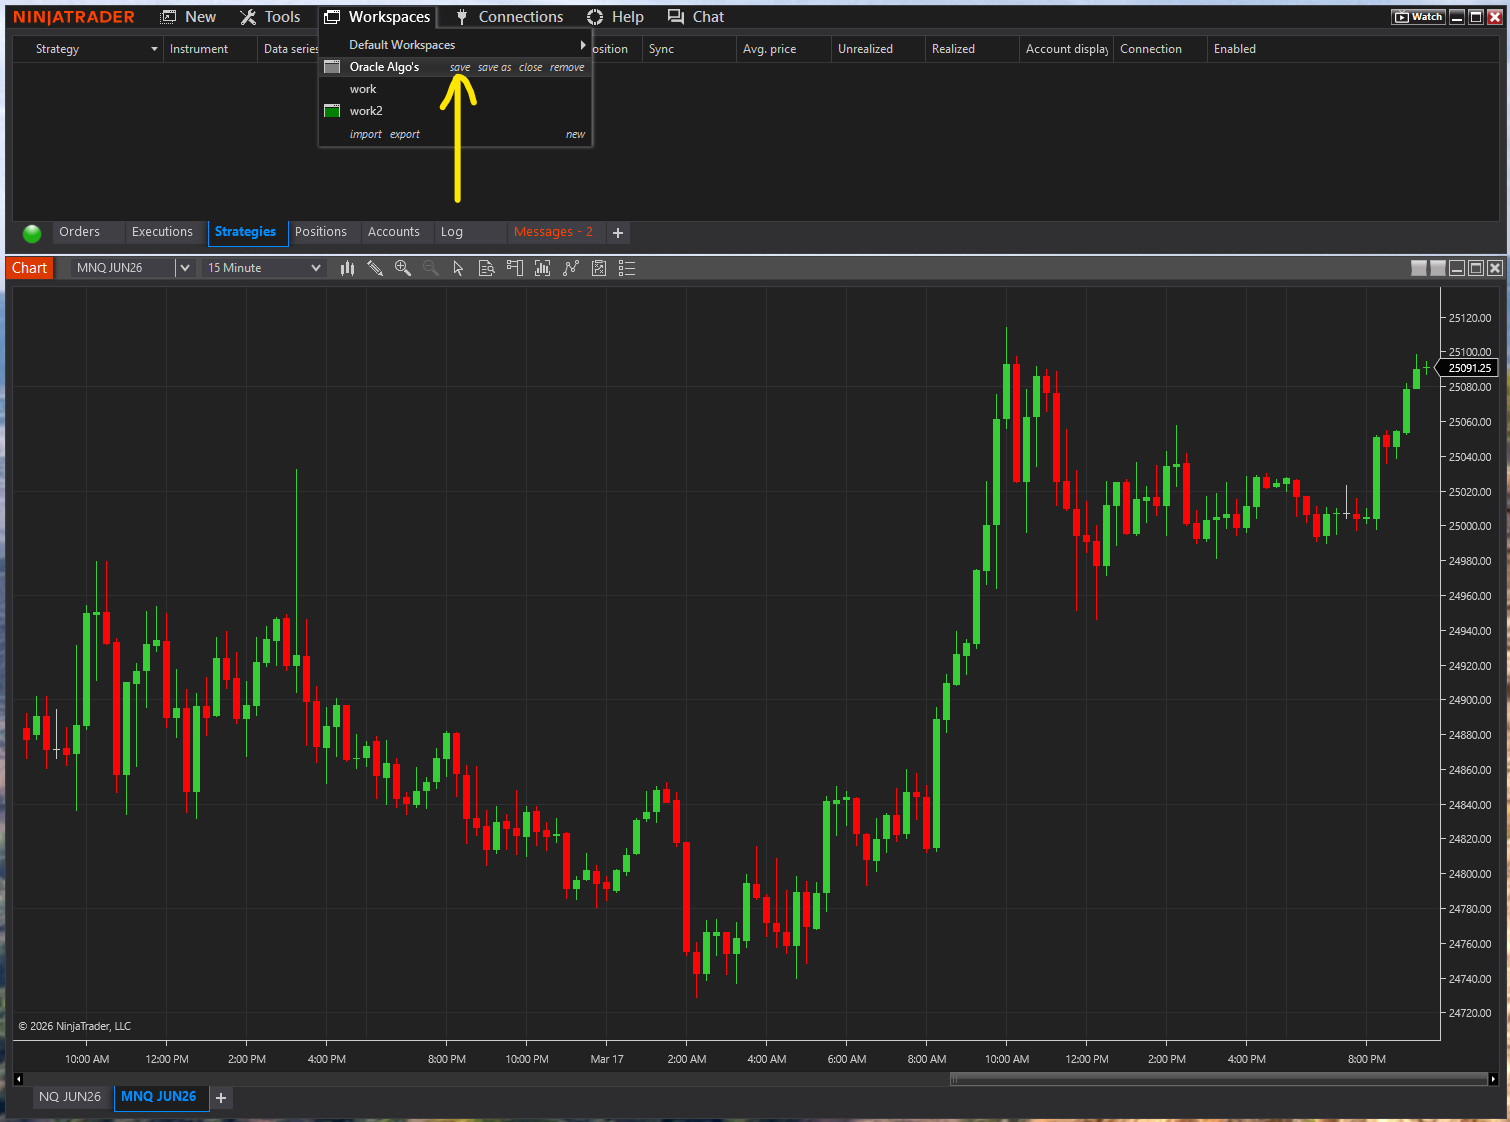
Workspaces save your entire layout — charts, windows, positions, everything. We're going to create a dedicated workspace for your Oracle setup.

In the Control Center menu bar:

  • Click Workspaces in the menu bar
  • Click new
Workspaces menu with new option highlighted
Workspaces → new — creates a fresh workspace

A dialog will ask you to name the workspace. Type Oracle Algo's (or any name you like) and click OK.

Workspaces menu showing Oracle Algo's workspace created
Your new "Oracle Algo's" workspace now appears in the Workspaces menu.
Workspace created!

You now have a clean workspace. Everything we build from here saves to this workspace automatically.

5

Open your first chart — NQ 15-minute

Time to see some price data. We'll create a chart for the E-mini NASDAQ (NQ) — this is the primary instrument your algorithms trade.

In the Control Center:

  • Click New in the menu bar
  • Click Chart
New menu open with Chart highlighted
New → Chart — this opens the Data Series dialog where you configure what you're looking at.

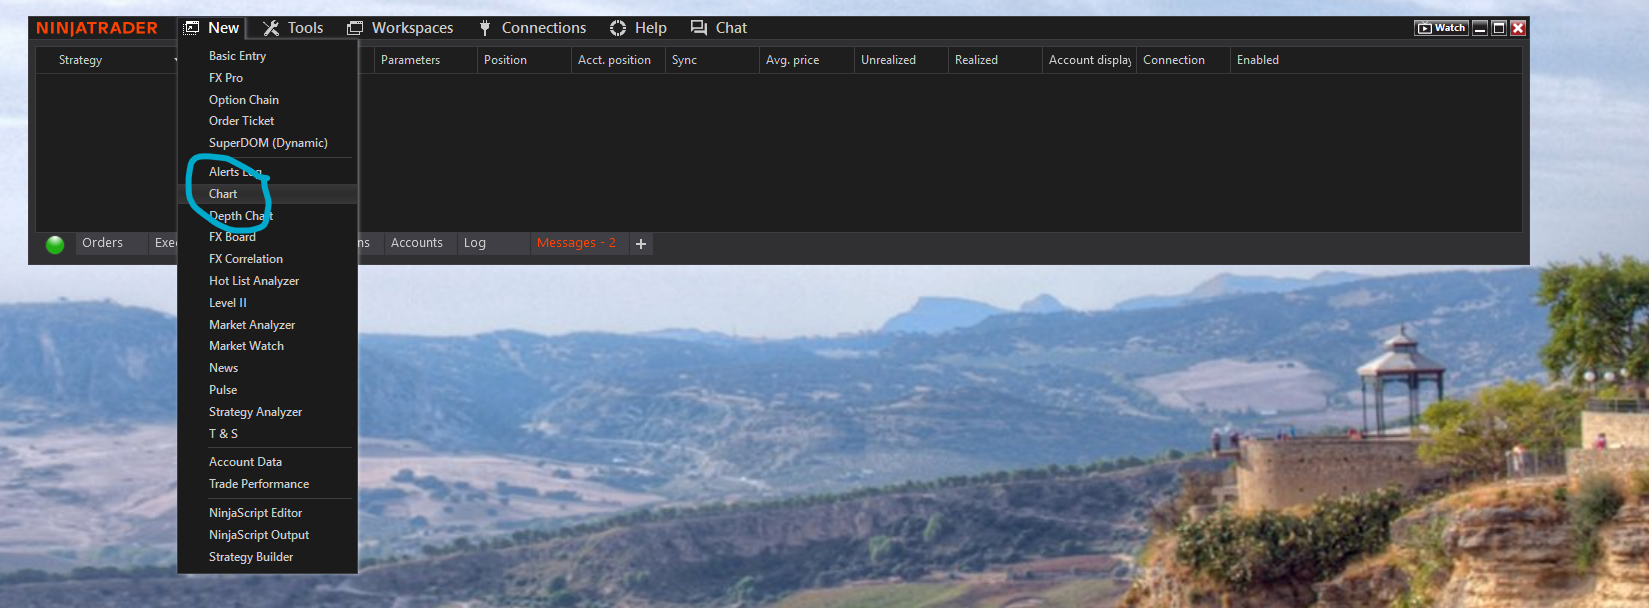
The Data Series dialog will appear. Set these values:

  • Instrument: Type "NQ" and select the current contract (e.g. NQ JUN26)
  • Type: Minute
  • Value: 15
  • Days to load: 5
Data Series dialog with NQ JUN26 selected, 1 Minute
Data Series dialog — NQ JUN26 selected, Type: Minute, Value: 15. Click OK to create the chart.

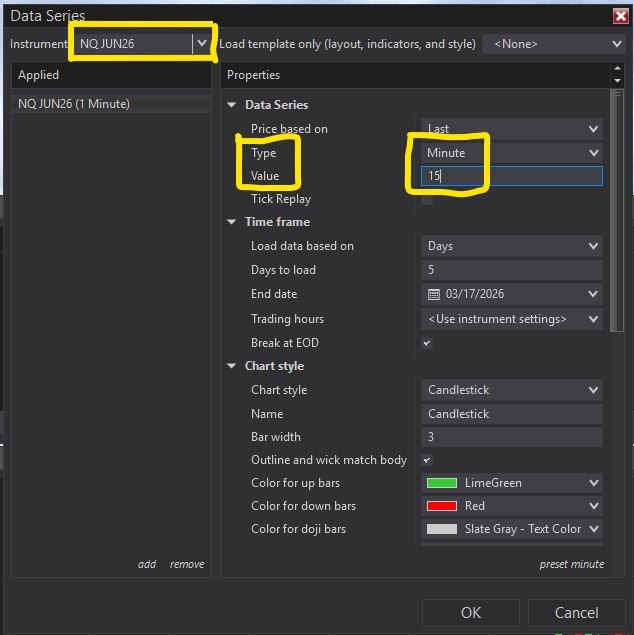
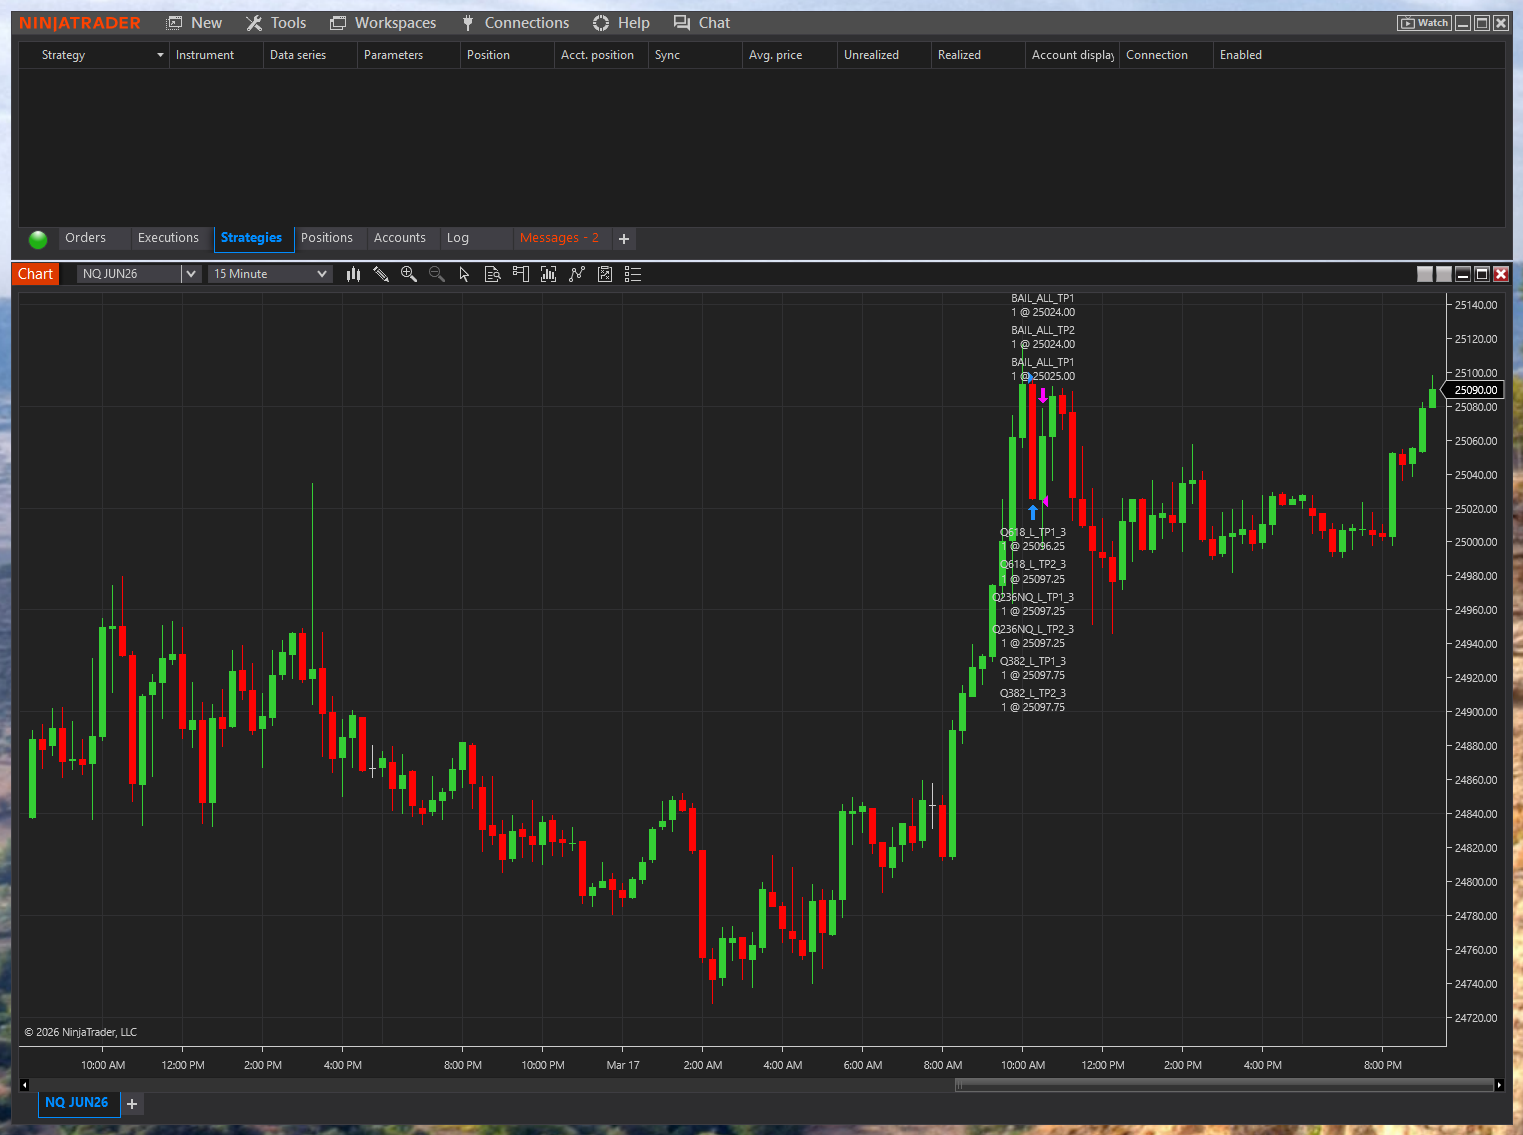
Click OK. Your first NQ chart will appear with live price data!

NQ 15-minute chart showing live price action with trade executions
Your first NQ chart — live price data with candlesticks. The Strategies tab is visible at the top.
Don't see NQ?

If NQ doesn't appear in the instrument search, your market data subscription may not be active yet. Go back to Step 2 and verify your CME data is turned on.

6

Add a second chart tab — MNQ 15-minute

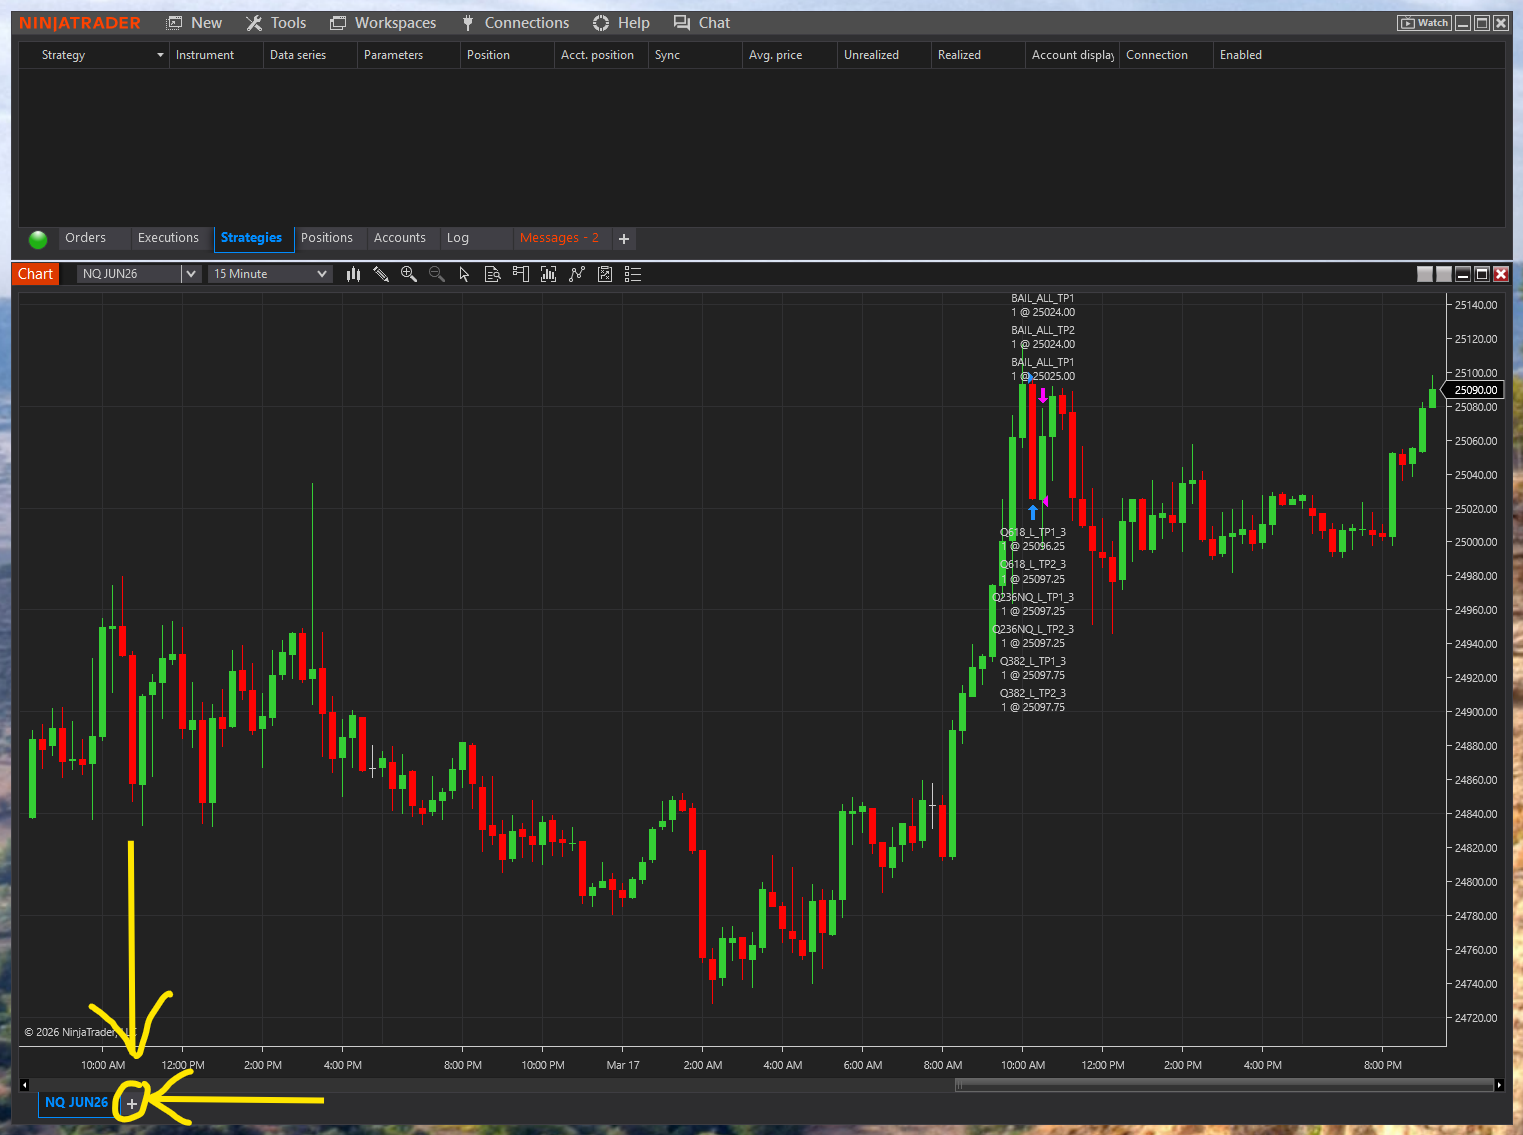
Now we'll add a chart for Micro E-mini NASDAQ (MNQ). This is the smaller contract your algorithms can route orders to. Instead of opening a separate window, we'll add it as a tab in the same chart window.

At the bottom of your NQ chart, click the + button to add a new tab:

NQ chart with arrow pointing to the + button at bottom to add a new tab
Click the + button at the bottom of the chart to add a new tab.

The Data Series dialog opens again. This time set:

  • Instrument: Type "MNQ" and select the current contract (e.g. MNQ JUN26)
  • Type: Minute
  • Value: 15
Data Series dialog with MNQ JUN26, Type: Minute, Value: 15 highlighted
MNQ JUN26 — Type: Minute, Value: 15. The highlighted fields are what you need to set.

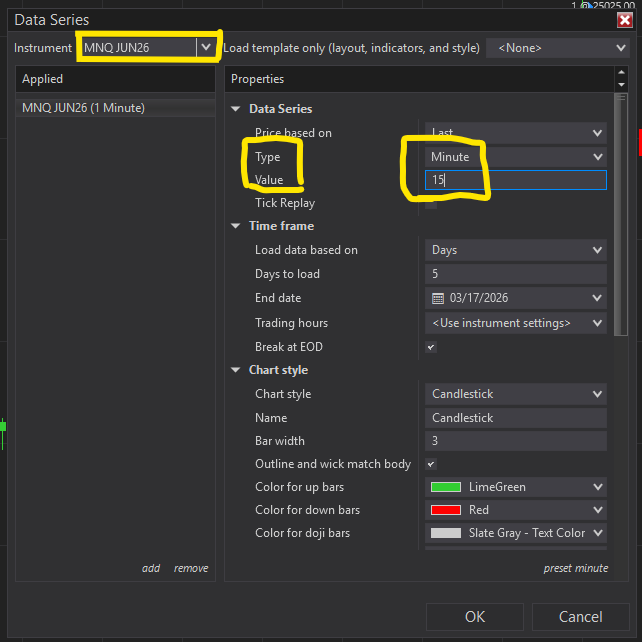
Click OK. You now have both NQ and MNQ as tabs at the bottom of your chart window:

Chart window showing NQ JUN26 and MNQ JUN26 tabs at the bottom
Both charts in one window — NQ JUN26 and MNQ JUN26 tabs at the bottom. Click either tab to switch.
7

Save your workspace

Now that your charts are set up, save the workspace so this layout is preserved every time you open NinjaTrader.

  • Click Workspaces in the menu bar
  • Click save next to your workspace name
Workspaces menu showing save option next to Oracle Algo's
Workspaces → save — locks in your chart layout so it's there next time you open NT.
Your Oracle workspace is ready!

Control Center running, settings configured, NQ chart, MNQ chart, workspace saved. You're set up and looking at live futures data.

Checkpoint — Verify Your Setup

Before moving on, confirm:

  • Control Center is open with green connection dot
  • Multi-provider is enabled (Tools → Settings → General)
  • Time zone is set to (UTC-05:00) Eastern Time
  • Your "Oracle Algo's" workspace is created and saved
  • NQ chart is open with live candlestick data
  • MNQ chart tab is added in the same window
  • No other default windows or panels cluttering the screen

Share a screenshot with Oracle on Discord if you'd like verification before continuing.